Sunday, May 31, 2009

Fruit Salad – Cantaloupe, Orange, Apple and Grape


The idea for making large containers of fruit salad ahead of time goes to my friend Sue. She shared this idea with me about a month ago and I have been enjoying it ever since. If you haven’t tried making fruit salad on the weekend to last a few days give it a try. It works like a charm. Thanks Sue!

Fruit Salad – Cantaloupe, Orange, Apple and Grape
Makes 3.2 quarts

Ingredients:

1 cantaloupe, cut into bite size pieces
1 orange, peeled and cut into bite size pieces **
1 gala apple, cut into bite size pieces
1 cup of green grapes, halved

Directions:

Mix everything together and refrigerate. This will last a few days in the refrigerator if covered tightly.

** Please note, Sue would supreme her oranges. I, being the rebel that I am, leave the membrane between the citrus sections for extra fiber and cholesterol protection. I read that the membrane of the grapefruit helps to remove the existing plague from your arteries and began leaving all citrus membrane on my fruit. Before you ask, I don't know if the membrane theory has any validity but on the outside chance it does I figured why not give it a go.

Nutritional Information (entire recipe):

Amount Per Serving
Calories - 456.32
Calories From Fat (3%)- 14.81
Total Fat - 1.76g
Saturated Fat - 0.43g
Cholesterol - 0mg
Sodium - 92.9mg
Potassium - 2260.14mg
Total Carbohydrates - 114.68g
Fiber - 14.14g
Sugar - 99.7g
Protein - 7.88g

Comments:

When something like this fruit salad is on the top shelf of the refrigerator, it becomes my default mid afternoon snack of choice. Since the entire container (which no human could possibly eat) is only 456 calories, this makes a great dish for when you need a little something but don’t want a lot of calories. You could jazz this up with a few toasted walnuts or almonds when you get ready to serve. A little drizzle of lemon cello over the fruit would also be divine. If you have mint in your garden you could add some julienned mint leaves or a nice minty syrup you made with agave. The options are endless for dressing this up.

Broccoli and Potato “Cream” Soup


(this soup is not a beauty contestant but tastes delicious)

Last week at cooking class our topic was soup. This class got my mind swirling thinking of different soups I could make that would be healthy.

Broccoli is a very popular vegetable at my house. We always have a minimum of one five pound bag of broccoli from Costco in our freezer at all times. I love the taste of broccoli and I love that this little cruciferous vegetable is a potent cancer fighter. I try to include broccoli in our meals whenever I can. Broccoli was the starting point for my soup tonight.

I added the cauliflower to the soup for additional cruciferous punch and to reduce the overall amount of potato in the soup. When the cauliflower is pureed it behaves like potato. I add cauliflower to most potato dishes I make for this reason.

I roasted the potatoes to give them a little texture. I didn’t want the potatoes to disintegrate into the soup.

The garlic oil was used to give the soup a little background garlic flavor.

I added the lemon so that the acid would lift the flavor in the dish without adding more salt. I try to keep our daily sodium level below the recommended 2200 mg’s a day.

Broccoli and Potato “Cream” Soup
Serves 5

Ingredients:

3 pounds of frozen broccoli florets
1 pound of frozen cauliflower florets
1 ½ pounds of red potatoes, cut into bite size pieces
1 tablespoon of garlic flavored olive oil
one red onion, finely diced
1 tablespoon of garlic flavored olive oil
3 cups of water
2 cups of plain unsweetened soymilk
2 teaspoons of kosher salt
juice of one lemon
salt and pepper to taste

Directions:

Preheat oven to 375 degrees.

Roast cauliflower and broccoli on a half sheet pan for approximately 20 minutes, until cooked through and slightly tinged on the edges. On a separate sheet pan toss potatoes with one tablespoon of garlic flavored olive oil and a pinch of salt and roast until they are done (the exact time will depend on the pieces of the potato and your oven) mine took 5 minutes longer than the broccoli and cauliflower.

While the veggies roast cook the diced onion with the remaining tablespoon of garlic oil until it is translucent.

When the cauliflower and broccoli are cooked, put them in your blender (reserving a few broccoli tops for texture) along with the water and puree until smooth. Add the pureed vegetables and reserved broccoli tops to the pan containing the onions and turn the heat to low. Add the soymilk and salt and heat soup to desired temperature. Just before serving add the lemon juice and taste the soup for salt and pepper, and adjust as desired.

Serve hot.

Nutritional Information:

Amount Per Serving
Calories - 309.17
Calories From Fat (24%) - 75.69

Total Fat - 8.54g
Saturated Fat - 1.13g
Cholesterol - 0mg
Sodium - 914.61mg
Potassium - 2051.51mg
Total Carbohydrates - 49.8g
Fiber - 5.27g
Sugar - 4.92g
Protein - 15.87g

Comments:

This is a very thick soup, almost more of stew. It has a nice gentle broccoli flavor with a hint of lemon and garlic in the background. I liked the texture the potatoes gave the soup. If you wanted to add more textural variation you could finish the soup with a few toasted whole wheat croutons. The only thing I didn’t like was the color of the soup. I would have preferred the soup to be a more vibrant green. Next time I will add a little pureed raw spinach at the very end to brighten the green color. If you didn't mind the extra calories a little drizzle of a beautiful emerald green parsley oil would be a nice addition before serving.

Green Salad with Sun Dried Tomato Pesto and Lemon Vinaigrette


We always have a light green salad with our dinner. Normally I don’t post these as I think they are boring to look at and write about. However, we do eat them everyday, sometimes more than one per day, so I decided that I should include them as long as hadn’t posted the same salad previously.

The dressing for this salad uses some of the sun dried tomato pesto from yesterday’s lunch. I “recycle” leftovers often. I also used the olive oil from the stove top roasted garlic for extra flavor.

Green Salad with Sun Dried Tomato Pesto and Lemon Vinaigrette
Serves 4

Ingredients:

2 tablespoons of sun dried tomato pesto (no nuts)
juice of one lemon
1 tablespoon of garlic olive oil (from stove top roasted garlic)
10 cups of mesclun mix
1 seedless cucumber, sliced into bite sized pieces
1 red bell pepper, sliced into bite sized pieces
salt and pepper, to taste

Directions:

Whisk together sun dried tomato pesto and lemon juice until combined. Add garlic olive oil and whisk until emulsified.

Wash and spin dry lettuce. Chopped cucumber and red bell pepper into bite sized pieces.

Toss vegetables and salad dressing together. Check salad for salt and pepper and add as desired.
Serve immediately in chilled bowls.

Nutrition Information:

Amount Per Serving
Calories - 71.77
Calories From Fat (47%)- 33.61

Total Fat - 3.82g
Saturated Fat - 0.49g
Cholesterol - 0mg
Sodium - 78.55mg
Potassium - 450.1mg
Total Carbohydrates - 7.85g
Fiber - 3.39g
Sugar - 3.11g
Protein - 2.41g

Comments:

This salad gets it flavor from the lemon juice, garlic oil and sun dried tomato in that order of intensity. You could add different vegetables or crushed nut covered balls of almond feta if you like. I wanted this to be a low calorie and reasonably low fat salad to accompany our soup tonight for dinner.

Product Review: Barbara’s Bakery Wheat Free Fig Bars


I don’t typically buy things that are in a package. I was out of the house one day without food (bad planning on my part) and needed something fast because it had been 6 hours since I ate breakfast and I was hungry. I needed to go grocery shopping so I figured I would grab something there for lunch. You know what happens when you go grocery shopping when you are hungry, right? I was in the organic packaged foods aisle and saw these cookies. I love figs so I thought I would read the label. It didn’t look too bad. So I decided to buy the cookies and give them a try. To my surprise they were amazing. I only buy a few packages a year, but they are great treat. The opened package keeps well in the refrigerator in a Ziploc bag (until my husband finds it).


I have copied the ingredient list and nutritional facts from the package below:

Ingredients: Fig Filling (Organic Fig Paste, Pineapple Juice Concentrate, Citric Acid), Pineapple Juice Syrup, Oat Flour, Brown Rice Flour, Organic Fig Paste, Barley Flour, Date Paste, Raisin Juice Concentrate, Soy Lecithin, Baking Soda, Salt

Nutritional Facts:

1 bar
Servings per container 18
Calories 60
Fat calories 0

Total Fat 0g
Saturated Fat 0g
Trans Fat 0g
Cholesterol 0mg
Sodium 25 mg
Total Carbohydrates 13g
Dietary Fiber 1g
Sugars 8g
Protein 1g

Comments:

Both my husband and I like these cookies. They are sweet and “figgy” and the cookie is tender. If you see these, and like figs, pick up a bag. I think you will like them.

Saturday, May 30, 2009

Whole Wheat Pasta with Sun Dried Tomato Pesto and Dandelion Greens


We are going out for dinner tonight, which means we won’t be eating as healthy as we do at home. I decided to throw together a very quick whole grain pasta for lunch today. I don’t usually make 4 ingredient dishes, but that is what I made today.

Whenever I make pasta I always undercook it a little. When pasta is cooked al dente (slightly undercooked) it is a lower glycemic food. Neither my husband nor I have glucose tolerance issues. However, I see no reason to make my pancreas, or his, work harder than necessary.

This pasta is low in fat but high in flavor from the dandelion greens, sherry vinegar and sun dried tomatoes, and is packed with nutrition. The lycopene in the tomatoes is thought to help prevent a growing list of cancers. The dandelion greens are reported to reduce blood pressure, cholesterol as well as fight cancer. It is hard to tell if any of these foods will actually do what is reported, but as long as you like the taste does it really matter?

Whole Wheat Pasta with Sun Dried Tomato Pesto and Dandelion Greens
Makes 4 servings

Ingredients:

13.25 ounces of Whole Wheat Rotini
6 tablespoons of sun dried tomato pesto (recipe below)
13.5 ounces of dandelion greens, trimmed and julienned
2 tablespoons of pine nuts

Directions:

Cook the pasta is 6 quarts of boiling salted water for 2 minutes less than the package indicates.

When the pasta has 5 minutes remaining on the timer begin to make the sauce. Start with 6 tablespoons of tomato pesto in a large skillet. Add the dandelion greens and ½ cup of the pasta cooking water. Cook over medium heat so the dandelion greens will wilt. If the greens become too dry add a little more pasta cooking water. Add the cooked pasta to the sauce when the timer goes off, put a lid on the pan and turn off the heat. Allow the pasta to stand covered for 2 minutes so that it will absorb the sauce.

Serve the pasta hot or cold with the pine nuts and salt and pepper to taste.

Nutritional Information:

Amount Per Serving
Calories - 447.03
Calories From Fat (12%)- 54.94

Total Fat - 6.44g
Saturated Fat - 0.23g
Cholesterol - 0mg
Sodium - 456.51mg
Potassium - 373.86mg
Total Carbohydrates - 86.26g
Fiber - 14.64g
Sugar - 6.74g
Protein - 16.17g

Comments:

The pasta has a nice sun dried tomato flavor that isn't overwhelming but is the dominant flavor in this dish. The dandelion greens lose a lot of their bitter flavor when cooked. Next time I may double the dandelion greens in this dish. I liked the textural variation that you get from the pine nuts. This dish will need a little pinch of sea salt added when serving.

Sun Dried Tomato Pesto
Makes ¾ of a cup – serving = 1 tablespoon

Ingredients:

½ cup of sun dried tomatoes packed in oil, drained of their oil
¼ cup of sherry vinegar
2 tablespoons of water
2 cloves of garlic
½ teaspoon of kosher salt

Directions:

Put everything the food processor and puree until the paste is smooth. Store the unused portion in the refrigerator until needed.

Nutritional Information:

Amount Per Serving
Calories - 7.25
Calories From Fat (7%)- 0.54
Total Fat - 0.07g

Saturated Fat - 0.01g
Cholesterol - 0mg
Sodium - 125.68mg
Potassium - 84.14mg
Total Carbohydrates - 1.71g
Fiber - 0.29g
Sugar - 0.85g
Protein - 0.35g

Comments:

This sun dried tomato spread has a nice background of acidity from the vinegar. I use it on pasta, pizza, and to top whole grain crackers that are spread with almond feta. It can also be thinned out with a little water or tomato juice and used to dress a salad. I also like to toss it into cold pasta or rice salads and use it with roasted vegetables.

Chemicals and Additives in Cosmetics and Household Products


(pictured: Gated Entrance to a House in Charleston, South Carolina)

When I started buying organic produce it was natural to also begin cleaning our house with more “green” methods. What didn’t immediately occur to me were things like shampoo, mouthwash and make up. It seems so obvious now that neon blue mouthwash must have added dye, but I didn’t give it much thought initially.

If you are interested in learning more about the potentially harmful additives in the products in your house check out this great website. They have tested many products and have rated them in terms of the potential harm (cancer and otherwise) they can do. I will warn you this website can become addictive. The first time I got into the cosmetic database I lost hours looking up all the products that I had on hand.

Peanut Butter and Banana Oatmeal


Sometimes you don’t feel like making a big deal out of breakfast, even on the weekend. Today we decided to give the green smoothies a rest and have oatmeal.

Oatmeal is one of those foods that can be very bland. This lack of flavor can be good or bad. I like that oatmeal is a blank canvass onto which I can add a lot of other flavors.

Today’s oatmeal is sort of Elvis inspired with peanut butter and banana. The peanut butter adds protein and the banana is good for kidney health. As everyone who knows me knows I am fond of saying, “we are all about the kidney” in my house. Anything that helps with kidney health is very popular with me. Once I read that consuming bananas was associated with a reduction in the incidence of kidney cancer that meant bananas were going to show up nearly everyday in our meals. Hopefully you can’t over dose on bananas since I have tendency toward being all or nothing about things.

Peanut Butter and Banana Oatmeal
Serves 1

Ingredients:

1 cup of almond milk, unsweetened
½ cup of oatmeal
1 tablespoon of peanut butter
¼ teaspoon of cinnamon
1 banana, sliced
1 teaspoon agave

Directions:

Put almond milk, oatmeal, peanut butter and cinnamon in a microwave safe bowl. Microwave until hot (this took 3 minutes in my microwave for 2 bowls). Remove the bowls from the microwave.

Top with banana slices and agave. Serve hot. Be certain to stir before eating.

Nutritional Information:

Amount Per Serving
Calories - 470.59
Calories From Fat (25%)- 118.22

Total Fat - 13.82g
Saturated Fat - 2.53g
Cholesterol - 0mg
Sodium - 201.34mg
Potassium - 989.89mg
Total Carbohydrates - 76.4g
Fiber - 11.1g
Sugar - 26.05g
Protein - 17.86g

Comments:

This is a nice filling breakfast that will stay with you for a while due to the carbs and fiber. I like the peanut butter and banana combination with a hint of cinnamon in the background. Some chopped peanuts would make a nice garnish if you have them.

The Battle of the Non-Dairy Milks


(pictured: Espresso with almond milk (L), Espresso with Brown Rice Milk (R))

This morning we made espresso so that we could compare almond milk versus brown rice milk and decide which one we liked better. I expected to like the brown rice milk better in my espresso since it has a thicker more fatty mouth feel when tested plain. To my surprise both my husband I and I preferred the almond milk in the espresso.

In the photo above the almond milk is pictured on the left. I added the same amount of non-dairy milk to each cup and you can see the almond milk had more of an impact in terms of color. It also had a bigger impact on the taste. The cup of espresso with almond milk was less acidic. Both versions had a little more sediment in the bottom of the cup than I wanted. However, the sediment issue should be resolved by straining the milk through cheesecloth.

I will continue to make both milk versions. However, almond milk is the winner when I want milk in my espresso. Expect to see the almond milk updated for nutritional information very soon. It is bugging me that I don't have numbers for that milk.

Friday, May 29, 2009

Vegetable and Black Fungus Stir Fry


Sometimes I want a quick meal with items that I have on hand. This stir fry is that type of recipe. Since I had the cooked brown rice in the refrigerator from making the brown rice milk yesterday this meal came together in about 15 minutes.

The dish is a little high in sodium, but it is not as high in sodium as it would have been had I used soy sauce. If you are unfamiliar with liquid aminos you should look for it in your store. It tastes like soy sauce but has less sodium than even the popular low sodium soy sauces on the market.

This dish is low in calories, but is very filling from all the vegetables. We had a huge bowl of this dish, which left us both full.

The garlic, ginger and onions are high in antioxidants and are anti-inflammatory. Consuming mushrooms has been linked to a lower incidence of breast cancer. The varied colors of the vegetables in this dish maximize the vitamins and nutrients you will be consuming. You will notice the dish doesn’t have a lot of green. I have been a green binge lately so decided to give the green a little bit of a break tonight.

Vegetable and Black Fungus Stir Fry
makes 2 servings

Ingredients:

10 dried black fungus mushroom
4 cups of water to rehydrate mushrooms
1 red onion, slivered
1 carrot, cut in half and sliced
1 red bell pepper, slivered
2 stalks of celery, slivered
1 inch of ginger, julienned
2 cloves of garlic, minced
2 teaspoons of sriracha
3 tablespoons of liquid aminos
1 tablespoon of toasted sesame oil
2 cups of cooked brown basmati rice

Directions:

Put dried mushrooms in a heatproof bowl with the water and microwave for three minutes. Allow to sit while you prep the remaining vegetables.

Slice red onions, carrot, red bell pepper, and celery.

For the sauce, julienne the ginger, mince the garlic and put them in a small bowl. Add the sriracha, liquid aminos and roasted sesame oil.

Drain the black fungus mushrooms and cut into bit size pieces.

Put the sauce into a large skillet over high heat. Add the onions, celery and carrot and cook for 2 minutes. Add the remaining ingredients and stir to combine. Continue to cook for 3 or 4 minutes on high to heat all the ingredients.

Serve hot.

Nutrition Information:

Amount Per Serving
Calories - 368.44
Calories From Fat (21%) - 78.16

Total Fat - 8.93g
Saturated Fat - 1.36g
Cholesterol - 0mg
Sodium - 1612.03mg
Potassium - 569.74mg
Total Carbohydrates - 64.84g
Fiber - 8.45g
Sugar - 8.83g
Protein - 7.14g

Comments:

This dish is very filling and flavorful. It also has a little bit of heat to it from the sriracha. If you don’t like a lot of heat in your food, begin with half the amount of sriracha. I make similar dishes to this monthly. I like that you can use whatever vegetables you have on hand. The only thing I keep the same is the sauce. Sometimes I add a little agave to the sauce to reduce the heat a little. You can also remove on tablespoon of the liquid aminos and replace it with fresh lime juice if you want to reduce the sodium without losing flavor.

Cold Cucumber Soup with Raw Spinach and Lime


I have been posting a lot of “green” things over the last week. I don’t know if this is due the produce that is now available locally grown, or my body is craving green vegetables now that the weather is turning warm. No mater the reason, green foods are very healthy and soup is no exception. This is nice cool refreshing soup that is light in taste, texture and calories yet is still satisfying.

This is another recipe that is packed with vitamins, minerals and phytonutrients. One serving of this soup contains over 2100 international units of vitamin A which is enough for the entire day for a middle aged woman. The soup also contains 75 mcg of folate, which is approximately 25% of what you need for the day (again for a middle aged woman). If you are curious about what levels of vitamins and minerals are recommended for you and the members of your family this is a nice source of information from the USDA.

This soup with its onion, garlic and spinach is another good source of phytonutrients that help protect you from cancer. I like that it is also tasty and low in calories. The little bit of fat in the roasted garlic makes certain that your body can process the fat soluble vitamins that are present.

Cold Cucumber Soup with Raw Spinach and Lime
Makes 4 cups – 2 servings

Ingredients:

1/2 cup of sweet onion, chopped
2 tablespoons of white wine
2 cloves of roasted garlic (or sauté it with the onion in wine)
1 seedless cucumber
1 lime (zest and juice)
12 ounces of brown rice milk
1 cup of raw spinach
½ teaspoon of sea salt
2 tablespoons of parsley, finely minced - optional

Directions:

Sauté the onion in white wine until translucent. Remove from heat and cool to room temperature.

Cut the skin from the cucumber in four slices leaving a rectangle of cucumber. Dice the cucumber with skin, into small dice. Reserve the diced cucumber with the skin for a soup garnish.

Cut the cucumber without skin into large chunks that will fit in the blender. Put the cucumber (without skin) in the blender. Add the cooled onions, and roasted garlic, lime juice, rice milk, raw spinach and sea salt. Process until the mixture is smooth. Taste for seasoning before refrigerating.

Store the soup in the refrigerator until it is completely cold. Top with diced cucumber, lime zest and minced parsley (if using). I also like to finish my soups with a little freshly grated Himalayan sea salt and black pepper.

If you want you can top with a dollop of tofu sour cream or a teaspoon of good extra virgin olive oil.

Nutrition Information:

Amount Per Serving
Calories - 136.28
Calories From Fat (25%)- 34.33

Total Fat - 3.97g
Saturated Fat - 0.6g
Cholesterol - 0mg
Sodium - 551.67mg
Potassium - 484.91mg
Total Carbohydrates - 20.53g
Fiber - 3.52g
Sugar - 4.53g
Protein - 3.57g

Comments:

This soup is light and refreshing. The acid from the lime gives the flavor of the soup a little lift without adding unnecessary sodium.

When the weather is hot and you don’t feel like eating something hot this soup, a green salad, and a couple of whole grain crackers makes a great meal.

Banana and Spinach Smoothie


We liked the smoothie I made yesterday but thought that it would be better if it had a little more banana flavor and less peanut butter. I think I got it right today both in terms of flavor and texture. At least my husband and both liked it, so that is good enough for me.

Today I added a little cinnamon to the smoothie for health and flavor. Cinnamon has been shown to reduce blood glucose, trigylcerides and cholesterol. In a study by the USDA, cinnamon was shown to reduce the growth of leukemia and lymphoma (cancers). Cinnamon is an anti-inflammatory food. The ability of cinnamon to reduce blood clotting is well documented. Overall, cinnamon is a good thing to include in your diet wherever possible.

Banana and Peanut Butter Breakfast Smoothie with Raw Spinach
Makes 2 servings

Ingredients:

2 bananas
2 tablespoons of peanut butter
1 cup of almond milk
2 tablespoons of flaxseeds
1/4 teaspoon of cinnamon
2 small bunches of young spinach (about 20 leaves or 2 cups)
2 cups of ice

Directions:

Put everything in the blender and process until it is completely smooth. Serve immediately in chilled glasses.

Nutrition Information:

Amount Per Serving
Calories - 332.12
Calories From Fat (38%) - 127.12
Total Fat - 14.86g
Saturated Fat - 2.5g
Cholesterol - 0mg
Sodium - 161.09mg
Potassium - 839.3mg
Total Carbohydrates - 43.09g
Fiber - 8.6g
Sugar - 20.9g
Protein - 10.17g

Comments:

The texture of this smoothie was much better than yesterday. The extra banana undoubtedly helped, as did the reduction in liquid and the use of chilled glasses. The smoothie was thick and rich, almost like a milk shake. The banana flavor was the most pronounced, but it didn’t overwhelm the smoothie. I could taste a hint of peanut butter in the background. As usual I thought the spinach was at most a background flavor. I couldn’t taste the cinnamon at all. Next time I will double the cinnamon.

Both my husband and I have decided the spinach in our smoothies is a good thing, and something that we will continue to do through the summer. We both like knowing that we are consuming a healthy raw vegetable in our breakfast.

Nutritional Info updated 07.05.09

Thursday, May 28, 2009

Collard Wraps with Roasted Garlic Hummus, Walnuts and Grated Carrot


Tonight I decided to make an easy dinner from things I had in the refrigerator. I like to experiment with food and today I made collard wraps. I had purchased the collards from the farmers’ market this weekend because they are part of the cruciferous vegetable family. I love to include as many cancer fighting foods in our diet as I can.

This was my first time to make collard wraps and it was a little more difficult than I expected, but I think that I have figured it out. Take the collard leaf and remove most of the thick stem (but not all). I sliced the bulk of the stem from the leaf. It is important not to slice out the stem completely, or it will be more difficult to keep the filling inside the wrap.

When the stem is mostly removed I smeared the bottom half of the collard (the end near the stem) with roasted garlic hummus. I put chopped walnuts, finely diced celery and grated carrot on top the hummus. Next I rolled up the filled collard like a burrito and sliced it in half and served it cold.

Collard Wraps with Hummus, Walnuts, Carrot and Celery
makes 2 servings

Ingredients:

4 large collard leaves, bulk of stem removed so they are easy to roll
½ cup of walnuts, chopped
1 carrot, grated
2 stalks of celery, finely minced
freshly ground black pepper to taste
1 cup of roasted garlic hummus

Directions:

Mix the walnuts, carrot and celery together. Add black pepper to the nut and vegetable mixture according to your taste.

Cover bottom ½ of the collard leaf with ¼ cup of hummus. Add ¼ of the nut and vegetable mixture on top of the hummus. Roll the filled collard up like a burrito and cut in half. You can secure the wrap with a toothpick if necessary.

Nutrition Information:

Amount Per Serving
Calories - 324.4
Calories From Fat (55%) 177.25

Total Fat - 21.14g
Saturated Fat - 2.06g
Cholesterol - 0mg
Sodium - 495.08mg
Potassium - 625.38mg
Total Carbohydrates - 28.8g
Fiber - 9.17g
Sugar - 3.89g
Protein - 10.26g

Comments:

The collard makes a better sandwich wrap than I expected. It will take a little time to become proficient rolling the collard. However, since this is so much healthier than eating flour based wraps, I will be incorporating more collards into our diet in lieu of whole grains wraps. I think the texture of the walnuts was necessary to give this “sandwich” substance. I also believe that you need something “gooey” like a bean dip to help hold the filling in the wrap. The raw collard imparted less green flavor than I expected.

Next time I may add a few whole or lightly mashed chickpeas for texture. I also think a little lemon juice or zest would be good added to the vegetables on this sandwich.

Brown Rice Salad with Vegetables


This is what I call a clean out the refrigerator salad. What goes in the salad is a function of what I have on hand. There are a few rules I follow when I make these kinds of salad. I normally use a little more cooked grain (brown rice, millet, bulgur, or quinoa) than I do vegetables. I try to vary the color of the vegetables that I add to the salad. I like the dressing to be sharp in these salads so that the final salad is not too bland or requires a lot of salt. I also think the salad need a little heat from the crushed red peppers or harissa.

All the ingredients in this salad are healthy. The variety of vegetables serves to increase the variety of vitamins and minerals this salad contains. I like knowing that this salad is good for me and helps to protect me from chronic disease.

Brown Rice and Vegetable Salad
Makes 7 – 1 cup servings of salad

Ingredients:

4 cups of cooked brown rice, cooled
½ cup red bell pepper, finely diced
4 inch piece of cucumber, finely diced
¼ of a red onion, finely diced
3 stalks of celery, finely diced
½ cup of finely sliced green onion tops
1 lemon (juice and zest)
1 tablespoon of sherry vinegar
2 tablespoons of extra virgin olive oil
½ teaspoon of harissa, or crushed red peppers
1/2 tablespoon of thyme, dried
salt and pepper to taste

Directions:

Combine rice and vegetables in a large container with a lid. Whisk the dressing ingredients, lemon through thyme, until thoroughly combined. Add dressing to the rice and veggies and toss everything together. Taste for seasoning and add salt and pepper as desired. Refrigerate salad until ready to serve.

Nutritional Information:

Amount Per Serving
Calories - 176.77
Calories From Fat (24%) - 43.19

Total Fat - 4.95g
Saturated Fat - 0.75g
Cholesterol - 0mg
Sodium - 10.9mg
Potassium - 188.79mg
Total Carbohydrates - 30.51g
Fiber - 3.34g
Sugar - 0.99g
Protein- 3.23g

Comments:

I make brown rice salads a few times a month. The salads are different depending on what I have on hand. These types of salad improve as the rice has time to absorb the flavors of the dressing. Chickpeas would be a good addition to this rice salad. When I have olives on hand, I sometimes dice those and add them to the salads as well.

Brown Rice Milk with Cashews


A few weeks ago when we bought coffee from a local coffee shop we asked for soymilk for our coffee. The coffee purveyor explained that they do not carry soymilk because it separates if the coffee is too hot. They explained that they used rice milk instead since it doesn’t have the problem of separating in high heat. That explains why sometimes my soymilk separates and led to my thinking about making rice milk. Today I also made a batch of almond milk so I decided if we had both on hand we could do a little coffee taste test and decide which non-dairy milk we preferred in our coffee.

I decided to use brown rice to make the milk because I do not buy white rice any more, unless it is carnaroli, but that is another story and recipe. I wasn’t certain the brown rice would work, but decided I had nothing to lose.

Brown rice is much healthier than white rice. Brown rice is a good source of manganese and selenium. Manganese helps the body to produce energy from food. Selenium is thought to reduce all forms of cancer.

The oil that is present in brown rice is thought to reduce cholesterol. Brown rice has a shorter shelf life than white rice due to the oil it contains. You should use your brown rice quickly, or store it in the freezer so the oil doesn’t spoil.

I added the raw cashews to the milk for richness. Two tablespoons of cashews was enough to give the milk a nice rich fatty milk mouth feel.

Rice Milk with Raw Cashews
Makes 4 cups

Ingredients:

1 cup of brown basmati rice cooked, still hot
3 cups of hot water
2 tablespoons of raw cashews
1/8 teaspoon of sea salt
agave to sweeten – optional (I didn’t add any)

Directions:

Put everything in the blender and process until smooth. Refrigerate until ready to use. This milk may try to separate in the refrigerator. Be certain to shake well before serving.

Nutritional Information:

Amount Per Serving
Calories - 71.01
Calories From Fat (20%) 14.29

Total Fat - 1.71g
Saturated Fat - 0.31g
Cholesterol - 0mg
Sodium - 78.85mg
Potassium - 59.89mg
Total Carbohydrates - 12.36g
Fiber - 0.98g
Sugar - 0.18g
Protein - 1.67g


Comments:

This milk turned out so rich and thick. Overall I am very pleased with this milk. I can’t wait to try it in a cup of coffee. This milk is so rich and thick you won't believe it is only 71 calories for 8 ounces. This recipe far exceeded my expectations. I love it when an experiment turns out well.

Almond Milk


(pictured: entire batch of almond milk after straining)

I decided to make my own almond milk because I do not want any chemical additives or cane sugar in my beverages.

I don't believe all the hype of soymilk being bad for you that is flying around the net these days. However, I do believe that too much of anything isn't good for you. I have decided to use other milks, in addition to soy, to order to maximize our consumption of different vitamins, minerals and phytonutrients from the different milks.

Almonds are high in monounsaturated fats and are associated with a reduction in heart disease. Consuming almonds in also associated with a reduction in cholesterol. Since the whole almond (with its skin) provides the most nutrition I save the residual nut pulp that results from making almond milk and add it to my veggie burgers.


(pictured: almond pulp on silpat, before drying)

Since part of the almond that goes into the milk is removed, I don’t think the numbers the cookbook program calculated are correct which is why I didn't post them. I have included the nutritional numbers for the Original Unsweetened Almond Breeze instead.

Almond Milk
Makes about 6 ½ cups - serving is 1 cup

Ingredients:

1 cup of almonds, soaked for 24 hours in 4 cups of water
7 – 8 cups of filtered water
1/8 teaspoon of sea salt
Dates or agave for sweetness - optional

Directions:

Drain the almonds of the soaking water and rinse well. Put ½ the drained almonds and ½ the salt in the blender and cover with 3.5 cups of filtered water. Process until no chunks of nuts remain. The amount of time you need to process will depend on the power of your blender. Taste the milk checking for consistency and salt level. If you think the milk is too thick add more water and blend again.

Pour the almond milk through a fine wire mesh strainer. While the first batch is straining process the second half of the almond milk in the blender.

Move the drained almond solids to a baking sheet lined with parchment or silpat and put it into a very low oven (150 degrees), until all the liquid has evaporated. I save the dried almond solids in the freezer and add it to veggie burgers.

Taste the strained almond milk and add additional sea salt if necessary. You can add agave if you like your milk sweeter. I did not add any sweetener to my almond milk since it will be used in smoothies or on cereal. If you would rather use dates to sweeten your milk return the milk and a couple of dates to the blender and puree until the dates are combined. I would strain the milk another time to remove any bits of dates that may remain after processing.

The milk may try to separate in the refrigerator. Be certain to shake the milk well before pouring.

Nutritional Information (taken from Unsweetened Almond Breeze):

Amount per Serving
Calories - 40
Calories from fat (75%) - 30

Total Fat - 3g
Saturated Fat - 0g
Cholesterol - 0g
Sodium - 150g
Potassium - 190g
Total Carbohydrates - 2g
Fiber - 1g
Sugar - 0g
Protein - 1g

Comments:

Making almond milk was much easier, and faster, than I expected. I thought the taste was very clean and fresh. It makes me wonder what they put in the packaged nut milks. I will definitely be using this milk a lot more in my cooking.

Peanut Butter and Banana Smoothie with Spinach


Smoothies make a great breakfast when the weather gets warmer. I love how quickly you can throw them together and get on with your day. Somehow hot food isn’t anything that I am very interested in when the weather gets warmer.

I have decided to try to include spinach in my morning smoothies for a while (basically until I get bored with it and need a change). I like that the spinach adds a lot of nutrition, and potentially helps to fight cancer.

Peanut butter is a very popular ingredient in our house. Both my husband and I love the gooey stuff. Peanut butter is packed with protein, as well as healthy fat, and calories. I buy the raw organic peanut butter that is made with the skins because it contains more nutrients.

I thought that peanut and banana sounded like a great smoothie combo today. Bananas are a good source of potassium which is essential for maintaining your blood pressure. Consuming bananas has also been associated with a reduction in strokes. Eating bananas has also been linked to kidney health and a reduction in kidney cancer. Since I have a particular fondness for kidney protection expect to see more banana based recipes in the future. Hummmm…. banana and peanut butter soy ice cream sounds good. But I will save that for another post.

Flaxseeds always go into my smoothies. Four little teaspoons of flaxseeds contain almost 100% of the daily recommended value of omega 3’s. Omega 3 fatty acids help protect you from forming dangerous blood clots. The consumption of omega 3’s is also associated with lower blood pressure.

Peanut Butter and Banana Smoothie with Spinach
Makes 2 large servings

Ingredients:

1 banana, very ripe
1 cup of soymilk
1 teaspoon of vanilla extract
3 tablespoons of peanut butter
2 tablespoons of golden flaxseed, freshly ground
2 bunches of young spinach, about 20 leaves
1 cup of water
2 cups of ice

Directions:

Drop everything in the blender and process until completely smooth. Serve cold.

Nutrition Information:

Amount Per Serving
Calories - 354.06
Calories From Fat (47%) 166.13

Total Fat - 19.42g
Saturated Fat - 3.35g
Cholesterol - 0mg
Sodium - 262.77mg
Potassium - 1123.49mg
Total Carbohydrates - 33.96g
Fiber - 9.27g
Sugar - 13.23g
Protein - 15.71g


Comments:

The peanut butter was the dominant flavor in this smoothie. We would like this better if the banana flavor was a little more prominent. I will be adding more banana in the smoothie I make tomorrow. My husband and I are not in agreement on the spinach flavor. I wasn’t certain I could taste it, he thought he could taste the spinach. Either way, the spinach was at most a background flavor. We both thought this was a very good starting point for a recipe.

Nutritional Info updated 07.05.09

Wednesday, May 27, 2009

Rhubarb and Ginger Sorbet or Granita


I made the base for this dessert yesterday and stored it in the refrigerator overnight. Today it took about 30 minutes, including clean up time, to make this dessert since the base was finished.

I used rhubarb because I bought it and didn’t know what I was going to make with it. I thought rhubarb and ginger sounded like a good combination. I like that rhubarb and ginger are both healthy foods.

Rhubarb is another food that is thought to be beneficial in the fight against cancer. Ginger contains very powerful anti-inflammatory compounds. I believe that it is a good idea to add anti-inflammatory foods whenever you can.

This granita or sorbet would be perfect to serve between courses, if you are having a multi-course dinner party. The flavor is bright and refreshing and not overly sweet. If you like things to be sweeter, add more agave.

Rhubarb and Ginger Granita or Sorbet
makes 4 large servings (approximately 1 cup servings)

Ingredients:

4 stalks of rhubarb, sliced into ¼ inch thick half moons (approx 1 pound)
1 inch of ginger, thinly sliced
4 cups of water
5 tablespoons of agave (enough to sweeten to your desired level)
¼ cup of citrus flavored or plain vodka

Directions:

Cook rhubarb and ginger in the water and agave syrup for about 15 minutes, until the rhubarb is completely soft.

Strain the liquid of all its solids into another container with a lid and move into the refrigerator to cool completely.

Directions For Granita only:

When ready to freeze add vodka and pour into a shallow pan with a lid and freeze. Each hour remove the granita from the freezer and scrap with a fork. At the beginning it will be mostly slushy and only freezing around the edges. In about two hours the granita will be mostly frozen, but you will still need to continue to scrape and refreeze. The granita will be finished in 6 hours or less.

Directions for Sorbet only:

When ready to freeze add vodka. Pour cold liquid into an ice cream freezer and churn for 25 minutes and then remove to a container with a lid and store in the freezer until ready to serve.

Nutrition Information:

Amount Per Serving
Calories - 78.17
Calories From Fat (3%) 2.59

Total Fat - 0.31g
Saturated Fat - 0.07g
Cholesterol - 0mg
Sodium - 16.18mg
Potassium - 385.26mg
Total Carbohydrates - 10.39g
Fiber - 3.88g
Sugar - 2.02g
Protein - 1.26g

Comments:

This is a light and refreshing dessert that is only lightly sweet with the 5 tablespoons of agave. You can make it sweeter if you wish. The rhubarb flavor is not very prominent in this recipe. However, I do like the light pink color and the sourness that the rhubarb brought to the dish. I found the ginger to be a more prominent flavor in this dessert. You could garnish this with a little finely diced crystallized ginger if you wish.

Mixed Berry and Spinach Smoothie


This morning I was moving slowly so I made a quick breakfast smoothie. I used what I had on hand, which is how I typically make smoothies.

We buy bags of frozen mixed berries from Costco because it includes three different dark berries (raspberries, blueberries and Marion berries), which are a great fruits to consume if you are eating for good health. Dark berries are packed with good nutrition. I include them in our diet as often as possible.

Most of the calories, and protein in this smoothie comes from the soymilk. Next time I may try to remove one cup of the soymilk and replace it with water and a couple tablespoons of oatmeal to reduce the calories a little.

If you are unfamiliar with flaxseeds, they are a fantastic item to include in your cereal, salads and smoothies. I buy whole golden flaxseeds at the health food store and keep them in my freezer and grind them just before I plan to eat them. Flaxseeds are very high in omega 3’s and are thought to lower cholesterol, reduce the risk of some cancers, and reduce inflammation. After reading “Eat to Live” I try to include flaxseeds in our diet daily.

The spinach was included in this smoothie for nutrition. The dark blue color of the berries masked the green from the spinach so it wasn’t obvious. However, the nutrition was the raw spinach was still there. Dark green leafy vegetables are so good for your health. Spinach is a rich source of vitamin’s K and A. Researchers have identified at least 13 compounds in spinach that function as anti-cancer agents. Spinach is a great food to incorporate in your diet whenever possible.

Mixed Berry and Spinach Smoothie
Makes 2 large smoothies

Ingredients:

3 cups of mixed frozen berries (blueberries, Marion berries and raspberries)
3 cups of soymilk
2 small bunches of young spinach (about 20 leaves)
2 tablespoons of flaxseeds (freshly ground)

Directions:

Put everything in a blender and process until smooth. Serve immediately.

Nutrition Information:

Amount Per Serving
Calories -408.9
Calories From Fat (25%) 103.08

Total Fat -11.66g
Saturated Fat -1.25g
Cholesterol -0mg
Sodium -271.11mg
Potassium -1256.21mg
Total Carbohydrates - 62.43g
Fiber - 16.8g
Sugar - 35.9g
Protein - 19.32g

Comments:

This smoothie is packed with nutrition and tastes only of berries. If you are trying to get more nutrition into your diet, this is a great way to start. I like knowing that I start my day with a healthy smoothie that is packed full of vitamins and phytonutrients.

Since a few of you have asked, no I couldn't taste the spinach at all. It added nutrition but without an overwhelming spinach flavor.

Nutrition Info updated 07.05.09

Tuesday, May 26, 2009

Mushroom and Walnut Pate


(pictured: Mushroom Walnut Pate topped with minced parsley and truffle oil on Wasa Crisps)

I wish I had a nicer photo of this pate to post to do the recipe justice. The overall flavor of this pate is amazing. The texture is soft and mimics the original very well.

There are a few things I love about this pate. First, I love that is that is very fast and easy. Second, the flavor is almost addictive. Third, mushrooms are good for protecting against breast cancer, and who doesn’t want that?

If you like mushrooms and Marsala, I think you will love this pate.

Mushroom and Walnut Pate
makes 20 servings of approximately 2 ounces each

Ingredients:

1 pound of fresh crimini mushrooms, quartered
2 ounces of dried mixed mushrooms (porcini, morels, chanterelles, and shitake)
1 cup of dry Marsala
2 tablespoons of roasted garlic (approximately one large head of garlic roasted)
2 teaspoons kosher salt
½ teaspoon of dried thyme
2 cups of walnuts, toasted
Juice of ½ a lemon

Optional Ingredients:

Zest of one lemon
1/2 cup finely chopped walnuts, which have been sautéed in olive oil
½ onion, thinly sliced and cut to 1 inch in length or less and fried until crispy
½ leek, halved lengthwise and thinly sliced and fried until crispy
¼ cup minced fresh parsley
truffle oil to drizzle on top

Directions:

Rehydrate the dried mushrooms in simmering water until tender, approximately 30 minutes. Remove the rehydrated mushrooms to a colander (rinse to remove any residual sand and dirt).

Pour the mushroom broth through a strainer that is lined with damp paper towel or three layers of cheesecloth. The mushroom broth can be saved as is in the freezer for later use or reduced by ¾ and saved frozen in concentrated form. This reduced stock is very useful in any dish including mushroom and sauce.

Return the rehydrated mushrooms to a large skillet and add the remaining ingredients (Marsala through thyme). Cook until the mushrooms are soft and the Marsala has almost evaporated (approximately a tablespoon will remain in the pan. Add the walnuts to the pan to warm.

Place mushroom mixture into the bowl of a large food processor (14 cup) or process in batches if necessary. Add the lemon juice and lemon zest, if using and process to thoroughly combine. Check for salt and pepper and move mixture to a covered bowl in the refrigerator.

To serve:

The pate can be served on toast, crackers, crostini, puff pastry rounds, or wonton crisps. It can also be used to dress pasta or to top chicken. The pate can be topped with the optional walnuts, fried onions, fried leeks and/or parsley or truffle oil.

The mushroom mixture also makes excellent ravioli filling. If using as ravioli filling it is best with a simple sauce that doesn’t compete, like thyme and garlic in olive oil. It would be good topped with a few chopped walnuts.

Nutritional information:

Amount Per Serving
Calories - 105.86
Calories From Fat (64%) - 67.35

Total Fat - 8.03g
Saturated Fat - 0.78g
Cholesterol - 0mg
Sodium - 190.97mg
Potassium - 217.28mg
Total Carbohydrates - 5.66g
Fiber - 1.31g
Sugar - 0.82g
Protein - 2.78g

Comments:

This recipe is so good that no one will care that it is vegan. It is one of my favorite recipes.

Epsom Salt and Magnesium


Today had me spending a lot of time researching Epsom salt. Since this has both a health and nutrition angle I decided to post the results of my research here.

My muscles were sore from exercising today so I decided to soak in a warm bath with Epsom salt. The Epsom salt always seems to reduce my muscle soreness. I decided to a little research today to find out if it was all in my head or whether the Epsom salt actually had a positive impact on muscle soreness.

Well …… it turns out that Epsom salt contains magnesium and sulfate, and that most Americans are deficient in magnesium. Oddly, in areas with hard water in the US (which also contains higher levels of magnesium and calcium) the average magnesium deficit is lower. An internet article I read also indicated that magnesium and sulfate are most efficiently absorbed through the skin. When I checked with a good friend and he indicated that only 20% of oral magnesium is absorbed, so …….. maybe soaking in Epsom salt makes sense.

Magnesium is known to regulate 325 different enzymes in the body. According to one of my nutrition books, magnesium is required for ATP metabolism, essential for the body to use glucose, and the synthesis of protein, fat and nucleic acids. But ….. does soaking in Epsom salt increase your magnesium enough to get a measurable impact?

According the Epsom Salt Council adding two cups of Epsom salt to your bath three times a week and soaking for at least 12 minutes is adequate to increase your levels of magnesium and sulfate. So, I thought this was a good reason to soak in a warm bath a few times each week.

Not so fast, my pharmacist friend isn’t on board with the benefit or the harm of soaking in an Epsom salt bath three times a week. When I asked why he disagreed he explained that when patients have a low magnesium level in the hospital they are given IV magnesium, not a patch or ointment with magnesium. Okay, so that makes sense. But maybe something new has been recently discovered. I continue my search, just in case those long baths were good for me.

Next I returned to my books and couldn’t find one book in my library that agreed with the Epsom salt soaking theory increasing your magnesium levels. Maybe one of my Dr. Andrew Weil books would agree. No luck, he isn’t advocating it either. So it appears the long soaks in the bath will have to remain a luxury not a necessity.

During all this research I was reminded that having adequate levels of magnesium is required for good health. Magnesium deficiency is associated with alcohol abuse, people that are regular strenuous exercisers, those with protein malnutrition, kidney disorders as well as prolonged vomiting or diarrhea. Magnesium is also important for heart function and appears to protect against hypertension. Good dietary sources of magnesium are: dark green leafy vegetables, cashews, artichokes, whole wheat, tofu, peanut butter, pinto beans, sunflower seeds, watermelon, banana, and potato.

Magnesium toxicity is possible and potentially fatal, but is rare. Some over-the-counter drugs contain magnesium these are: Maalox, Mylanta, Phillips’ Milk of Magnesia, and Di-Gel to list a few. A common symptom of magnesium toxicity is diarrhea. If you have diarrhea and have been taking any of the products above, I would recommend that you check with your doctor to make certain you aren’t harming yourself.

It appears the only benefit from soaking in a hot bath with Epsom salt was from the heat of the water, and the relaxation of the bath. Oh well…. you can’t blame a girl for trying to find a good reason to take more long baths. The long hot baths with Epsom salt may not help me, but at least I know it isn't going to hurt me either.

Finally, be careful what you believe that you read on the internet. I saw the idea that soaking in Epsom salts increased your magnesium in many places on the web. It is apparently a very well traveled fallacy. It makes me wonder how many other falsehoods are being promulgated. I suppose it means we all need to be more diligent when we check our facts.

New Software for Calculating Nutrition Information


Since a few of you had inquired about calories and other nutritional information I picked up a program that will calculate more nutritional information than anyone will ever need.

I began inputting recipes into the program this morning. As soon as I can figure out how to clip the nutrition data out of the software I will be adding information to all the recipes where I have all the required information. The software wants to know how much each recipe makes, and I didn’t record that every time ........ so, I will need to prepare some the posted recipes again. I will get all the recipes updated with nutrition information as quickly as I can.

So far it is an interesting program. There is a little bit of a learning curve to it. The software wasn't completely intuitive, but it wasn't bad either. In case anyone is interesting in buying the software to calculate numbers on other recipes I will add a review of the product once I have thoroughly tested it.

Monday, May 25, 2009

Oxygen Radical Absorbance Capacity (ORAC)


(pictured: a gratuitious photo I took of the Baltimore Inner Harbor that I wanted to share)

Oxygen Radical Absorbance Capacity (ORAC)

Do you know what ORAC stands for, and why you should know? The lab at the USDA developed a measure to attempt to quantify the ability specific foods have to offset oxidative stress in the body. If you are new to the concept of ORAC, use the link in this post to take you to a one page summary of the concept.

It is fascinating to see that many of the top foods are fruits and spices. Apples were the item that surprised me the most. I did not expect the common everyday apple to be so packed with nutrition. I used to pass up apples in favor of other more exotic fruit, like mangoes or kiwis. Once I found out that apples were so good for us we began eating them much more often.

My favorite part of this project was to learn that chocolate and red wine scored so well. If you need another reason to consume more of either chocolate or red wine check out the table in the middle of the one page summary.

If you are an information junkie and want to look up the nutrient values of specific foods, follow this link. I lost a good bit of time playing around with this database and researching which foods were more healthy for my family.

Chickpea Salad with Lemon and Garlic


I make this salad when I want something to pack for lunch with greens. It is also good with a sandwich or over a cold cooked grain (bulgur, millet or brown rice).

This salad contains a lot of vegetables. You can add more if you are looking for ways to get more raw vegetables into your husband. I find vegetables that are dressed with lemon juice and olive oil are likely to disappear.

Everything in this salad is good for you. It is so nice when you can eat something and know that it is filling your body with healthy vitamins, minerals and phytonutrients and helping you to prevent disease.

Chickpea Salad with Lemon and Garlic
Makes about 7 cups - 14 servings

Ingredients:

4 cups of cooked chickpeas
1 lemon, juice and zest
2 tablespoons of extra virgin olive oil
½ teaspoon of kosher salt
½ teaspoon of black pepper, freshly ground
½ teaspoon of dried thyme
½ of an English cucumber, finely diced
½ red bell pepper, finely diced
2 stalks of celery, finely diced
2 garlic cloves, grated

Directions:

Combine all ingredients and refrigerate. The flavor of this salad will be better the next day. Before serving taste to see if it has enough salt and pepper.

Serve cold.

Nutritional Information:

Amount Per Serving
Calories - 105.91
Calories From Fat (23%)- 24.2

Total Fat - 2.78g
Saturated Fat - 0.36g
Cholesterol - 0mg
Sodium - 278.16mg
Potassium - 181.8mg
Total Carbohydrates - 17.09g
Fiber - 3.48g
Sugar - 0.74g
Protein - 3.67g

Comments:

This salad is very flavorful. The grated garlic and lemon are dominant in this salad. If you like heat you could also add a teaspoon of harissa to this salad. If you mashed some of the chickpeas with a fork you could make a chunky sandwich filling with this salad. I think it would also be good on a sandwich with hummus as the sandwich glue.


Roasted Garlic Low Fat Hummus


(pictured: roasted garlic hummus with parsely and whole wheat pizzette to scoop)

I love hummus, in my opinion it is almost the perfect food. It is high in protein and fiber, and a small amount will keep me satisfied for hours. I like to use it on sandwiches as the “glue” to hold my veggies on the bread. Hummus is also good warm, topped with a little extra virgin olive oil and pine nuts and scooped with whole wheat pita chips.

Store bought hummus can be very high in fat and calories. This hummus is flavorful, from the roasted garlic and cumin, but low in fat. The only added fat to this hummus is oil that clings to the roasted garlic cloves.

Roasted Garlic Low Fat Hummus
Makes about 20 ounces - 6 servings

Ingredient:

2 cups of cooked chickpeas
2/3 cup of the bean cooking liquid
10 – 15 roasted garlic cloves (# of cloves depends on how much you like garlic)
1 teaspoon of kosher salt
½ teaspoon of cumin seed, toasted

Directions:

Put everything in your food processor and let it work for a few minutes. Then scrape down the sides food processor bowl and puree until completely smooth.

Scrape the hummus into a container with a lid and refrigerate until you are ready to eat.

Nutritional Information:

Amount Per Serving
Calories - 116.98
Calories From Fat (16%) - 18.24

Total Fat - 2.11g
Saturated Fat - 0.26g
Cholesterol - 0mg
Sodium - 554.91mg
Potassium - 171.08mg
Total Carbohydrates - 20.64g
Fiber - 3.7g
Sugar - 0.08g
Protein - 4.47g

Comments:

I make my hummus with the 15 cloves of garlic, so it is full of good garlic flavor. The cumin is a background note. With the big flavors in this hummus, I don’t miss the fat I left out, specifically the tahini and olive oil.

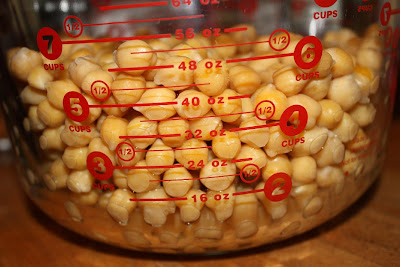
Cooking Chickpeas


When I have time I prefer to soak all my dried beans overnight or longer. I have read many articles that discuss the health benefits of sprouting your beans (starting the germination process) and the corresponding increase in bioavailability of the nutrients in the beans due to this sprouting. Even if you don’t believe the beans are more healthful if they are soaked overnight it dramatically reduces the cooking time. I soaked my beans for 7 hours and they were fully cooked in 20 minutes.

I like to make a large batch of beans when I cook so that they can do double duty. If I don’t have anything planned for the extra beans immediately I put them in a freezer Ziploc bag and freeze them to use later.

Cooked Chickpeas
Makes a little more than 6 cups (equivalent to approximately 4 – 15 ounce cans)

Ingredients:

2 cups of dried chickpeas
8 cups of cold water, to soak
8 additional cups of cold water, to cook

Directions:

Spill the dried chickpeas onto a half sheet pan and look for any broken or discolored beans and discard those. I also check with pebbles or dirt while they are on the tray. Rinse the beans in a large colander and place a in a large container with a lid. Cover with 8 cups of water and allow to sit in the refrigerator for 7 or 8 hours.

After the beans have soaked drain them of their soaking liquid and rinse. Put the chickpeas into a heavy bottomed pan (I use a Le Creuset enameled dutch oven) and turn the heat to medium high. My beans were tender in 20 minutes. Your cooking time will depend on the age of your dried beans. I find if you buy the beans at a health food store you are more likely to get “freshly dried” beans that cook much quicker. Mine were so fresh they had begun to sprout tails after 7 hours.

Drain the beans of the cooking liquid (reserving liquid if you are making hummus) and allow beans to cool.

Comments:

Cooking your own chickpea from dried is so much cheaper than canned beans. I paid $1.89 for the last pound of organic chickpeas I purchased. (a little under 12 cents an ounce) It takes about 11 ounces of dried chickpeas to make 2 cups or 6 cups of cooked chickpeas. Somehow I don't think I could buy 4 cans of organic chickpeas for $1.30. The canned beans I measured have ranged from 1-1/2 to 1-2/3 cups of drained beans in a 15 ounce can.

I also like that my chickpeas have no added salt. It is also nice to know they have no preservatives, and that I can cook them to the exact level of tenderness that I desire.

Potato Salad with Fresh Dill, Lemon and Dijon


Potatoes are the most popular vegetable consumed in America. Unfortunately they are normally served in the form of french fries. Potatoes can be a healthy food. They are a good source of vitamin C, a powerful antioxidant. Potatoes are also a good source of fiber, which most American’s need to incorporate in their diet. They also contain compounds that have blood pressure lowering potential and neutralize cancer causing agents.

I cook my potatoes in the skin to preserve the maximum amount of nutrients. I also retain the skin in most recipes so that those vitamins are consumed rather than thrown away.

I buy organic potatoes whenever possible because potatoes are one of those foods that is highly sprayed with pesticides and whose soil is also treated with fungicides. I have read (although I can’t remember where) that the chemicals that are used on potato fields are so toxic, that the farmers stay out of the fields for days after the chemicals are applied.

This potato salad does included mayonnaise, which is not a particularly healthy condiment. However, the amount of mayonnaise is much less than you would find on the normal potato salad. I only use enough mayonnaise to moisten the potatoes.


Potato Salad with Fresh Dill, Lemon and Dijon
Makes 6 servings

Ingredients:

2 pounds of red potatoes
1 tablespoon of kosher salt
1 lemon, zest and juice
4 stalks of celery, finely diced
4 tablespoons of red onion, finely diced that was soaked in white vinegar for at least 30 minutes (drain onion of vinegar before adding)
5 - 6 tablespoons of vegan mayonnaise
1 tablespoon of Dijon mustard
¼ cup of fresh dill, finely minced
½ teaspoon of kosher salt
½ teaspoon of black pepper, freshly ground

Directions:

Scrub potatoes, put do no peel. Place potatoes in a heavy bottomed pot and cover with cold water. Add kosher salt to the cooking water and turn the heat to high. After 15 minutes pierce a potato with a thin knife blade to see if they are tender. If tender, drain the potatoes and return the potatoes to the still hot pot so that the maximum amount of cooking liquid will evaporate from the potatoes. If not tender, continue to cook for another 5 minutes and check again for tenderness. The exact cooking time of the potatoes will depend on the size of the potatoes you are using.

Meanwhile, zest and juice a lemon. Place zest in the bowl the dressing will be mixed in.

When the potatoes have cooled in the pot for 15 minutes, cut into bite size pieces and move to a cool container. Add the lemon juice to the still warm potatoes so that it will absorb the juice which will happen in 5 or 10 minutes.

Thoroughly combine the mayonnaise, mustard, dill, lemon zest, salt and pepper. Toss the red onion and celery into the mayonnaise and stir to combine.

Add the dressing to the room temperature potatoes and stir to evenly coat the potatoes with the dressing. Taste to see if any additional salt and pepper are required.

Refrigerate until ready to serve. The flavor will improve as the salad sits in the refrigerator for a couple of hours.

Nutritional Information:

Amount Per Serving
Calories - 249.28
Calories From Fat (45%)- 113.21

Total Fat - 12.82g
Saturated Fat - 0.97g
Cholesterol - 0mg
Sodium - 299.37mg
Potassium - 994.73mg
Total Carbohydrates - 31.47g
Fiber - 3.6g
Sugar - 1.09g
Protein - 4.2g

Comments:

I like the flavor of this potato salad. It is a little acidic from the lemon juice, but not overly so. There is also a little tang from the dijon, although if you don't know it is in there you won't know exactly what you are tasting. The beautiful pink from the vinegar soaked red onions is lovely, as well as adding little acidic pops of flavor. This potato salad is not drenched in mayonnaise, but the salad is still moist without the unnecessary fat.

Sunday, May 24, 2009

Baltimore Farmers' Market - May 24, 2009


Today was a quick trip to the farmers' market to pick up our goodies from Pam at the CSA and visit Rudy and head home.

The CSA distribution at Calvert Farm was 8 shares today and we picked up the following: 2 bunches of baby spinach, 1 big bok choy, 1 bunch of spring onions, 1 large bunch of dandelion greens, 2 pounds of asparagus, and 1 large bunch of collard greens.

I choose the bok choy and collards because they are part of the cruciferous family. The Italian in me loves dandelion greens and has a nice pasta planned for them. I always buy asparagus when it is in season. The baby spinach made me want to make a spinach and lemon pesto. I have been wanting to try collards as a whole wheat wrap substitute for sandwiches. I think the bok choy is going to go into a stir fry or bibimbap, but I am not positive. Frequently I change my mind between the time I buy produce and it makes it way to the pan. By documenting my plans, hopefully I will stick closer to my original thoughts.

We picked up two bags of spring greens from Rudy at Cat's Paw Organic, for our daily salad. I love the freshness of salad that is freshly picked versus trucked for hundreds if not thousands of miles.
If you haven't tried shopping at your local farmers' market, I think you should give it a try. The quality of the produce we get at our farmers' market is far superior to what we buy at the supermarket. I am always surprised at how long the farmers' market produce stays fresh in our refrigerator. While we do try to eat all our fresh produce within a week, it does last longer than that if you don't consume it quite that quickly.

Whole Wheat Pizzette with Almond Feta and Marinated Artichokes


This entry is more a combination of items that I made previously on this blog than an actual recipe. It is an example of what you can do if you have the pizzette and almond feta in the refrigerator (or freezer).

Whole Wheat Pizzette with Almond Feta and Marinated Artichokes
Makes 8 pizzette, serves 4 with a salad and vegetable sides

Ingredients:

¼ cup of almond feta (not topped with oil and thyme)
1 tablespoon of extra virgin olive oil
1 tablespoon of parsley, finely minced
½ teaspoon of fresh thyme, leaves stripped from stems
freshly cracked black pepper
8 whole wheat pizzette
1 marinated artichoke, cut into eights

Directions:

Mix the almond feta, olive oil, parsley and thyme until well blended. Spread 1/8 of the almond feta mixture onto each pizzette. Top each pizzette with the marinated artichoke and freshly cracked black pepper.

These can be served cold, warm or hot.

Comments:

This makes a fast snack, or a nice addition to green salad for dinner.

Asparagus Bites with Sun Dried Tomatoes and Sherry Vinegar


Asparagus is high in vitamin K and folate. If you are taking a blood thinner you should check with your doctor before adding asparagus to your diet.

Folate is important for cardiovascular health. Without folate the body cannot convert homocysteine into cysteine. High homocysteine levels are associated with an increased risk of atherosclerosis. One serving of asparagus daily supplies 2/3’s of the daily recommended amount of folate.

Asparagus also contains inulin, which our body cannot digest. However, the good bacteria in our digestive system can digest inulin. The presence of inulin causes an increase in the population of good bacteria, leaving less room for the bad bacteria. This is thought to cause a corresponding increase in our immune function.

There are many reasons to eat your asparagus, in addition to the fact that they taste good.

Asparagus Bites with Sun Dried Tomatoes and Sherry Vinegar
makes 8 small servings

Ingredients:

2 pounds of asparagus, trimmed and cut into 1 ½ inch lengths
1 tablespoon extra virgin olive oil
¼ cup of sun dried tomatoes, diced
1 tablespoon sherry vinegar
salt and pepper to taste

Directions:

Saute the asparagus in olive oil for 3 minutes. Add the tomatoes, and sherry vinegar and cook one minute longer. Add salt and pepper to taste and refrigerate if not eating immediately. Serve cold, warm or hot.

Comments:

This makes a nice side dish and is good on a green salad, or tossed with a cooked grain like brown rice, bulgur or millet. It is also good with a little fresh lemon zest.

Cooked Radishes with Balsamic Vinegar and Shallot


Radishes are a member of the cruciferous family and offer the same anti-cancer properties as broccoli and cabbage. Adding radishes, and all cruciferous vegetables, to your diet makes sense if you want to reduce your probability of a cancer diagnosis. Radishes and their greens are also a good source of vitamin C, a powerful antioxidant. Consuming vitamin C has been associated with a reduction in asthma.

I am not huge fan of raw radishes, but cooked radishes are another item completely. When you cook radishes they loose their sharpness and their flavor becomes mellow and soft. I make a number of different cooked radish dishes, but this one is currently my favorite. I like the subtle flavor of the Pinot Grigio combined with the white balsamic vinegar. You could use regular balsamic vinegar in this recipe but the end result will not be the beautiful pink color you see in my photo.

Cooked Radishes with Balsamic Vinegar and Shallot
makes 6 small servings

Ingredients:

2 large bunches of radishes, about 1 pound trimmed
1 large shallot
1 tablespoon olive oil (could substitute half a small red onion)
2 tablespoons white balsamic vinegar
1/2 cup Pinto Grigio
¼ cup Italian parsley, leaves minced
Salt and pepper to taste

Directions:

Trim away tops and bottoms of the radishes, reserving the leafy green tops for soup. Slice each radish into a bite sized piece. Peel the shallot and slice into thin rings.

Heat the olive oil over medium heat in a large heavy skillet. Add the shallot and cook, stirring, until it starts to brown slightly. Add the radishes, balsamic vinegar and wine to the skillet. Cover the pan and lower the heat, and simmer for 10 minutes.

Remove the radishes to another container and simmer the juice left in the pan for about 3-4 minutes, or until it has reduced to a syrupy sauce. Combine the sauce and radishes. Season with salt and pepper to taste and sprinkle with parsley then serve. Can be eaten hot, warm or cold.

Comments:

The white balsamic and pinot grigio give the radishes a nice Italian flavor. The end result is a beautiful pink color, and a mild flavor. These radishes are always popular in my house.

Related Posts with Thumbnails